

Blocking customers in Splynx
Splynx has the ability to block non-paying customers automatically, however, administrators can block customers manually as well. When a customer's status is changed to Blocked or Inactive, Splynx sends a command to the router to block the respective customer. By default, Splynx does not cut the service, but places the IP address of the end-user into the address-list or gives him an IP address from the special IP pool for blocked customers. You just need to create the necessary firewall rules that block or redirects defaulters to a special page.
Mikrotik API
This method is useful if you do not use Radius authorization. Splynx uses Mikrotik API to execute commands on a router.
Pay special attention to the option Disabled customers to Address-List. As this changes the blocking behavior.

When the option is disabled 
When this option is enabled 
- SpLBL_blocked - for customers whose status is Blocked. And for customers with Active status, when service is blocked due to FUP or CAP blocking rules.
- SpLBL_new - for customers whose status is New.

Radius
Radius also provides the ability to block users in several ways.

Settings from the above screenshot can be found in Config → Networking → Radius → NAS config → NAS Type = Mikrotik → click on
Loadbutton.
Change of Authorization (CoA) packet
(customer's session does not break)
To use CoA select COA Block attribute for the Customer Block field (in NAS Type Configuration).

When a customer becomes blocked, splynx sends a CoA packet to the router with attributes specified in the CoA Block attributes field.

The same attributes for FUP:

By default, the field CoA Block attributes contains the attribute Mikrotik-Address-List = Reject_1. Having received such an attribute, the router adds the customer's IP to the Reject_1 list. The session is not interrupted, which allows, if necessary, open access to local resources without changing the customer's IP address.
If you put an IP address to the Address-List via CoA Block attributes, you should also put the IP address into another Address-List via CoA Restore attributes. Otherwise, the IP address will remain in the previous Address-List and the session will be still blocked.
Turn on the Radius incoming on the Mikrotik to process the CoA packets.


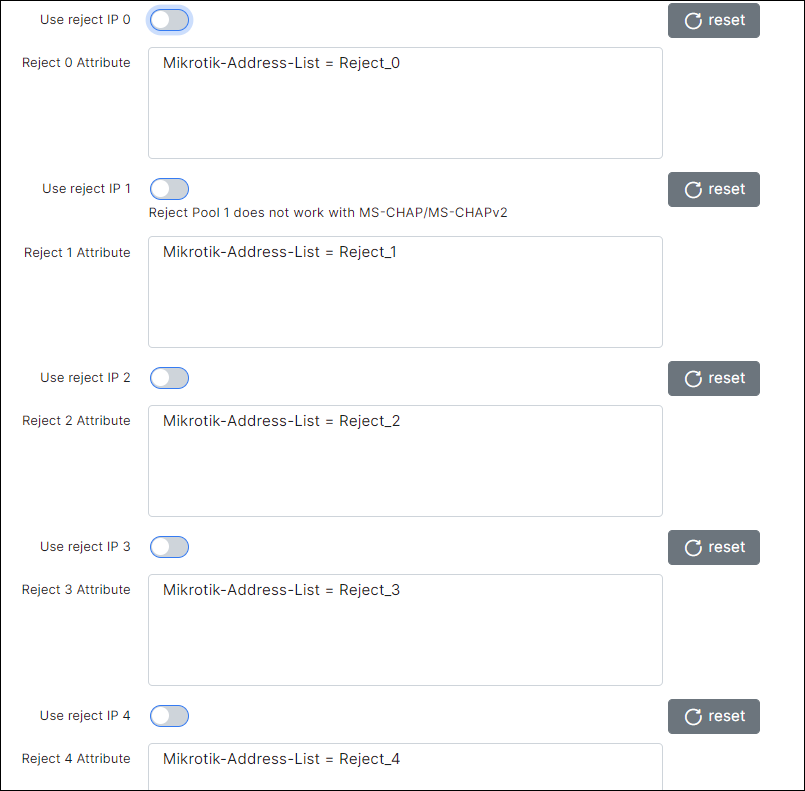
Reject IP pools
customers get an ip from a reject ip pool
By default, Radius allows connection (sends Radius-Accept) even if there is an authorization error. In the case of authorization errors, Radius will assign an IP address from reject address pools (lists). By default, these pools are 10.250.x.0/20. Pools can be configured in Config → Networking → Radius, as shown on the screenshot below:

- Reject IP 0 - when the User is not found (in fact, this Customer does not exist).
- Reject IP 1 - when the User is blocked, not active or not in the system (when the customer's status is not active).
- Reject IP 2 - when the User has a negative balance or a filter is applied.
- Reject IP 3 - when the User has the wrong MAC address (if enabled) or other error.
- Reject IP 4 - when the User has entered the wrong password.
For using Reject pools:
-
Set the value Block for the Customer Block field.

-
Enable the Use reject IP, as shown in the screenshot below.


Drop customer's session
interrupts customer session and prohibits further connection
-
Set the value Block for the Customer Block field.
-
Disable the Use reject IP as shown in the screenshot below.

Special blocking pages
Splynx has 4 default blocking pages under:
- http://your.splynx.url:8101
- http://your.splynx.url:8102
- http://your.splynx.url:8103
- http://your.splynx.url:8104
These are simple HTML files, which you can change via command line within your Splynx installation (via SSH). In the folder /var/www/splynx/web/errors/ there are folders labelled 1,2,3,4 that are corresponding to ports 8101, 8102, 8103 and 8104.
An example of the default blocking page is shown below:

An example of how this page can be customized:

Effective blocking
Often, providers just block customers by simply dropping all packets from the customers in the router's firewall. In addition to the fact that it is difficult for the customer to understand, the network is broken or blocked, customer's devices also in this case start to work less responsively since different software can constantly try to connect to the internet.
What can be done for effective blocking?
Provide access to the customer portal for blocked clients
- If the provider, when customers contact technical support, sends debtors to the portal, over time, some customers will become accustomed to entering the portal if there are problems with the network. This fact can also serve as an additional tool for quick network diagnostics. In the future, this may reduce the number of calls to technical support.
- A person who found out that he is blocked for non-payment after payment will be able to independently track the flow of money to the account.
All HTTP traffic of blocked customers should be redirected to the customer's portal or stub page.
- When a blocked customer tries to open any web page using the HTTP protocol, they will see a portal or a stub page that shows what could be the problem (insufficient balance, wrong password, etc.).
- Most modern OSs have a mechanism for detecting the state of the internet. The OS checks the network access when connected, if the system detects a stub page, it notifies the user about it by opening the stub page in a separate window/frame, displaying a notification in the notification panel, etc.
For example, Ubuntu:


Can we redirect the blocked customers from HTTPS to HTTP website?
It's not possible to do over SSL-encrypted connection, the redirection only works over HTTP. HTTPS traffic cannot be redirected to HTTP one, there will be the SSL encryption error and the connection rejection as a necessary measure. In such case, end-user should try to access different site. HTTP Strict Transport Security (HSTS) is a web security policy mechanism that helps to protect websites against man-in-the-middle attacks such as protocol downgrade attacks and cookie hijacking.
The best solution is to send many notification messages via SMS/Email, so then customer will not be surprised when one day the Internet will not work.
SMS can be configured in Config → Main → SMS and Email config is in Config → Main → Email. Also, it's necessary to enable Blocking wave notification in Config → Finance → Notifications and select a template.
DNS
When the DNS service does not work, the customer's computer spends about 10 seconds on each DNS request until it realizes that the Internet does not work.
time host wikipedia.org
;; connection timed out; no servers could be reached
real    0m10,031s
Some software will constantly try to connect, often at this point, the program interface may freeze.
A good solution is to set up your own caching DNS server, the traffic to which users will not limit. This is generally a good way to increase web responsiveness for all customers at a minimum cost.
If you use external DNS servers, you can limit the amount of traffic for them. Having added a burst at the beginning is useful during system boot.
For all other traffic, we will respond that the network is blocked
by sending ICMP packet type 3 code 9. "3/9 Communication with Destination Network is Administratively Prohibited".
This solution will remove all other delays, since the program sending the request will immediately be refused, instead of waiting for an answer for a while, and then trying again.
The screenshots below displays an attempt to open the website, they display the time after which the browser showed that the website is not available.
7ms (icmp3/9) vs 91645ms (drop rule)
DROP

ICMP 3/9

Practice
An example of setting up all of the above on MikroTik.
This is a universal example that covers all types of locks, if you are sure that you do not need any of them, you can skip the relevant rules.
WebProxy settings
proxy is used to correctly redirect the user to the portal or page stub
192.168.208.239 is the IP of an example splynx server. Don't forget to change it to your IP.
/ip proxy> set enabled=yes port=8080,8101,8102,8103,8104
/ip proxy access add dst-address=192.168.208.239 dst-port=80 action=allow
/ip proxy access add src-address=!192.168.208.239 dst-port=80 local-port=8080 action=deny redirect-to="192.168.208.239/portal"
/ip proxy access add src-address=!192.168.208.239 dst-port=80 local-port=8101 action=deny redirect-to="192.168.208.239:8101"
/ip proxy access add src-address=!192.168.208.239 dst-port=80 local-port=8102 action=deny redirect-to="192.168.208.239:8102"
/ip proxy access add src-address=!192.168.208.239 dst-port=80 local-port=8103 action=deny redirect-to="192.168.208.239:8103"
/ip proxy access add src-address=!192.168.208.239 dst-port=80 local-port=8104 action=deny redirect-to="192.168.208.239:8104"
/ip proxy access add dst-port="" action=deny


Firewall settings
NAT
All these rules redirect HTTP traffic to the appropriate stub pages. If you want, in some cases, to redirect the customer to the customer's portal, use to-ports=8080 for the necessary rules.
# For mikrotik API
/ip firewall nat add chain=dstnat action=redirect protocol=tcp dst-port=80 to-ports=8102  src-address-list=SpLBL_blocked comment="Blocked -> 8102"
/ip firewall nat add chain=dstnat action=redirect protocol=tcp dst-port=80 to-ports=8101  src-address-list=SpLBL_new comment="new -> 8101"

# If you're using radius
/ip firewall nat add chain=dstnat action=redirect protocol=tcp dst-port=80 to-ports=8101  src-address-list=Reject_0 comment="user not found"
/ip firewall nat add chain=dstnat action=redirect protocol=tcp dst-port=80 to-ports=8101  src-address-list=Reject_1 comment="blocked, not active or not in system"
/ip firewall nat add chain=dstnat action=redirect protocol=tcp dst-port=80 to-ports=8102  src-address-list=Reject_2 comment="negative balance or FUP/CAP"
/ip firewall nat add chain=dstnat action=redirect protocol=tcp dst-port=80 to-ports=8104  src-address-list=Reject_3 comment="wrong MAC"
/ip firewall nat add chain=dstnat action=redirect protocol=tcp dst-port=80 to-ports=8103  src-address-list=Reject_4 comment="wrong password"
Filter rules
If there are any resources that you want to keep available for blocked customers, add them to the address list labelled "white-resource":
/ip firewall filter add chain=forward action=jump jump-target=Blocked dst-address-list=!white-resource src-address-list=SpLBL_blocked
/ip firewall filter add chain=forward action=jump jump-target=Blocked dst-address-list=!white-resource src-address-list=SpLBL_new

/ip firewall filter add chain=forward action=jump jump-target=Blocked dst-address-list=!white-resource src-address-list=Reject_0
/ip firewall filter add chain=forward action=jump jump-target=Blocked dst-address-list=!white-resource src-address-list=Reject_1
/ip firewall filter add chain=forward action=jump jump-target=Blocked dst-address-list=!white-resource src-address-list=Reject_2
/ip firewall filter add chain=forward action=jump jump-target=Blocked dst-address-list=!white-resource src-address-list=Reject_3
/ip firewall filter add chain=forward action=jump jump-target=Blocked dst-address-list=!white-resource src-address-list=Reject_4

/ip firewall filter add chain=Blocked action=accept protocol=udp dst-port=53 dst-limit=2,0,src-address/1m40s
/ip firewall filter add chain=Blocked action=accept protocol=tcp dst-address=192.168.208.239 dst-port=80,8101,8102,8103,8104
/ip firewall filter add chain=Blocked action=reject reject-with=icmp-admin-prohibited dst-limit=10,0,src-address/1m40s
/ip firewall filter add chain=Blocked action=drop