

Xero accounting
Splynx is able to sync customers, invoices/credit notes and payments with Xero accounting software - https://www.xero.com

It's recommended do not configure the add-on on your own. Please, contact our support team before starting the accounting integration.
To install the Xero add-on, navigate to Config → Integrations → Add-ons:

In the list of available add-ons, click on the Update (apt) button, then locate or search for splynx-xero. Once located, click on the Install button in the Actions column to begin the installation process:

To install the add-on via CLI, use the following commands:
apt-get update
apt-get install splynx-xero
Once the installation has completed, navigate to Config → Integrations → Modules list and click on the edit button in the Actions column:


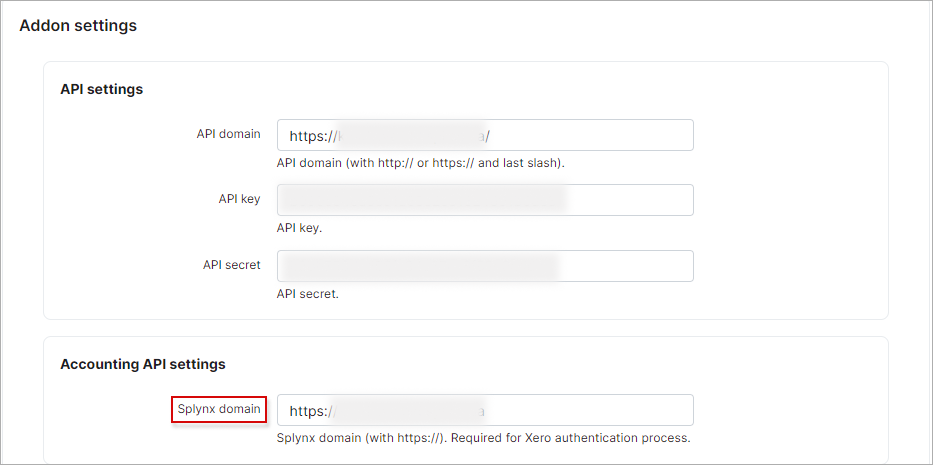
The general configuration of the Xero integration module can be viewed and edited here. First of all we need to enable Entry points status for portal and specify the Splynx domain in the Accounting API settings section.
The Splynx domain must be the same as the API domain URL but without the last slash /. HTTPS is required!

Synchronization settings:

-
Payment method ID - select the payment method for imported payments. Payments with selected method id will not be pushed to Xero;
-
Payment statement grouping - group payment statements by "month" or "day";
-
Partners ignore list - select the partners of which will be ignored in the sync process. Customers, invoices and payments of the partners selected here, WILL NOT be synced with Xero;

-
Payments synchronization direction - define the direction of syncing payments:
Xero → Splynx,Splynx → XeroorBidirectional. If Xero to Splynx direction is selected - all payments which were created in Splynx will not be synced to Xero; -
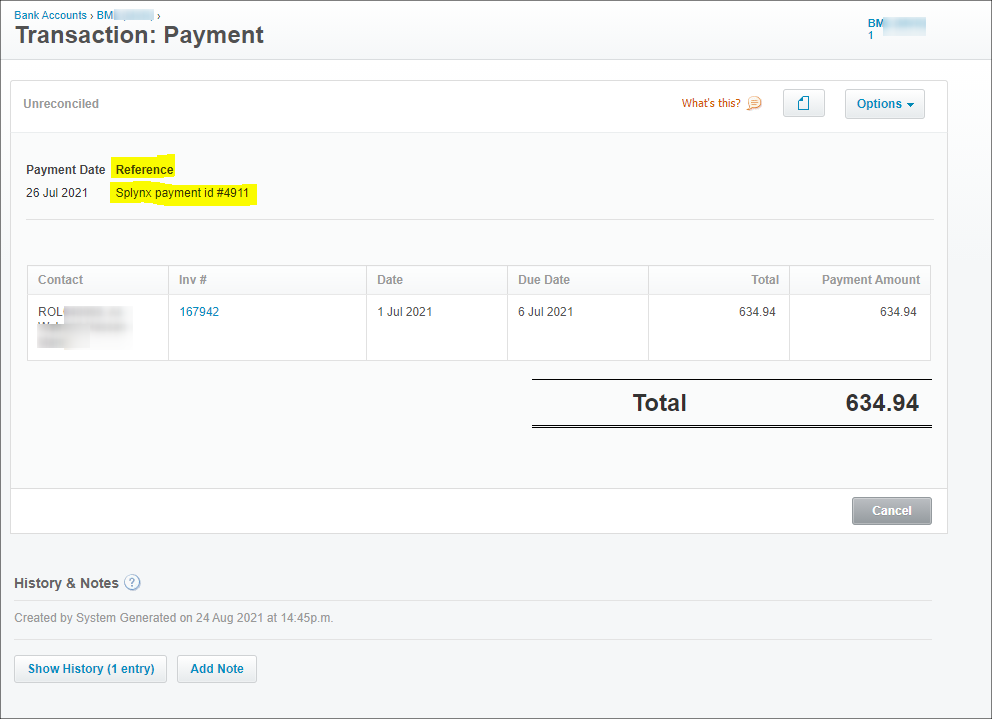
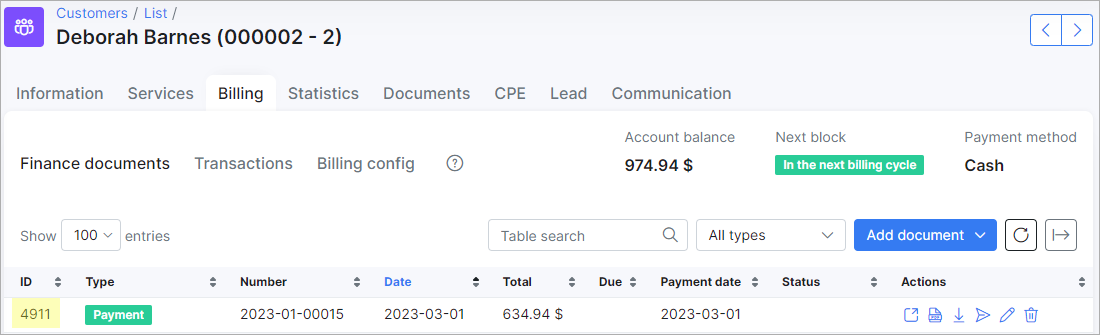
Payments reference field - select the payment field whose value will be sent as a payment reference when synchronizing payments to Xero;
Example
- Payments push to Xero - select the payment methods to sync to Xero. This selection only applies if the selected method to sync payments is set to
Splynx → Xero;
-
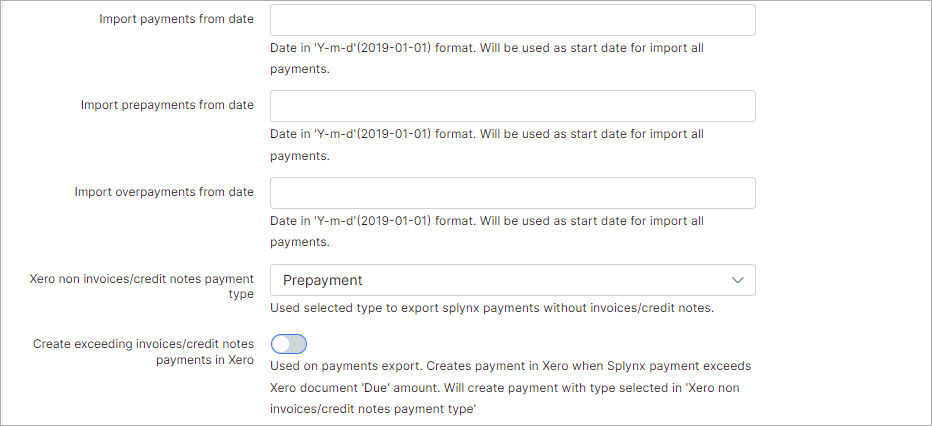
Import payments from date - specify the date in 'Y-m-d'(2021-03-31) format, which will be used as the start date for importing all payments;
-
Import prepayments from date - specify the date in 'Y-m-d'(2021-03-31) format, which will be used as the start date for importing all prepayments;
-
Import overpayments from date - specify the date in 'Y-m-d'(2021-03-31) format, which will be used as the start date for importing all overpayments (if customer accidentally pays too much);
-
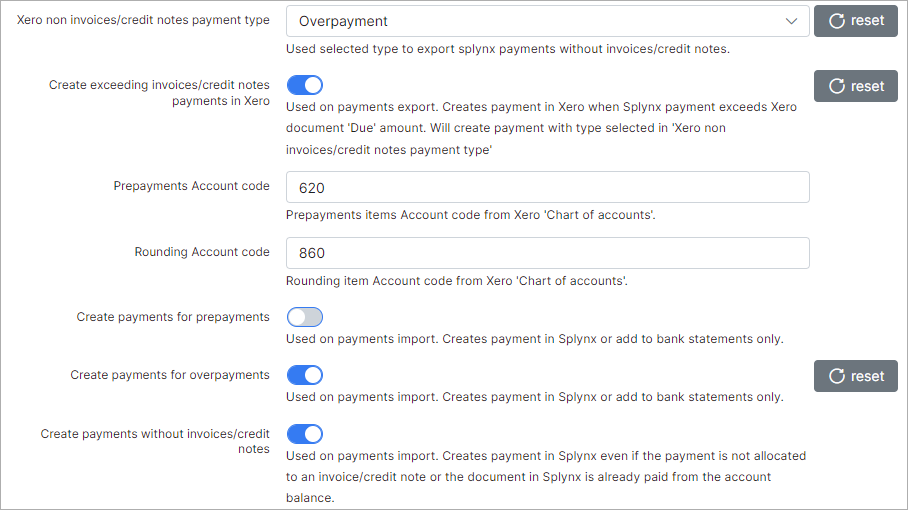
Xero non invoices/credit notes payment type - used to choose the type (
PrepaymentorOverpayment) of Splynx payment to export without invoice;
Example
A separate account has a rolling balance as a contra account for all payments that come from Splynx. Some customers paid R500 instead of R499 and the prepayments were allocated to your separate account. On allocation, you’ll take R499 of the payment to the invoice, and the R1 will just remain in the account as a running total. At the end of the year, the R1 amount will be significant and unallocated on the account. It would be much easier if all R500 could simply be allocated to the client's account. Then, we can allocate R499 from the overpayment to the invoice and the R1 'overpayment' will end up in the customer's balance.
- Create exceeding invoices/credit notes payments in Xero - toggle in the enabled state allows to create a payment in Xero when the Splynx payment amount exceeds the Xero
Duedocument amount. On Xero side will be created a payment with the type chosen in the Xero non invoice payment type select menu (PrepaymentorOverpayment). Such payment won't be linked to the invoice. In disabled status, when there is a partially paid invoice on Xero side, a Splynx payment won't be exported to Xero and you will see the error message -A validation exception occurred - Payment amount exceeds the amount outstanding on this documentinAdministration → Logs → Accounting integrations.
Example
Let's say in Xero add-on config, we use the Overpayment value in the Xero non invoice/credit notes payment type select menu. The Create exceeding invoices/credit notes payments in Xero toggle is disabled. The option Create payments for prepayments is disabled.


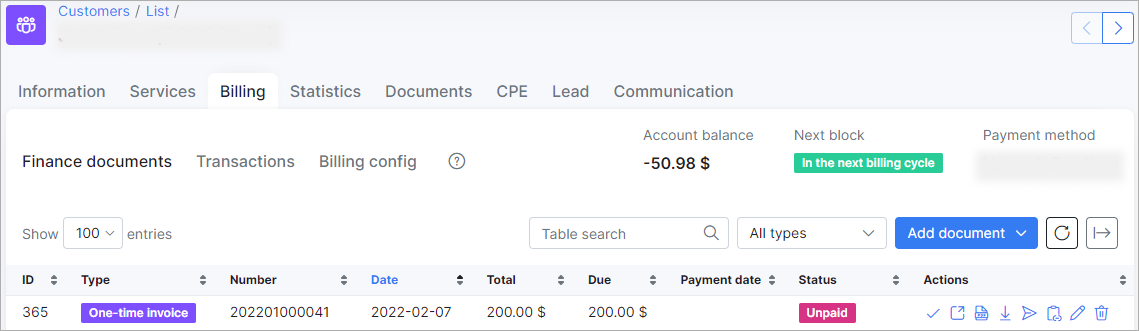
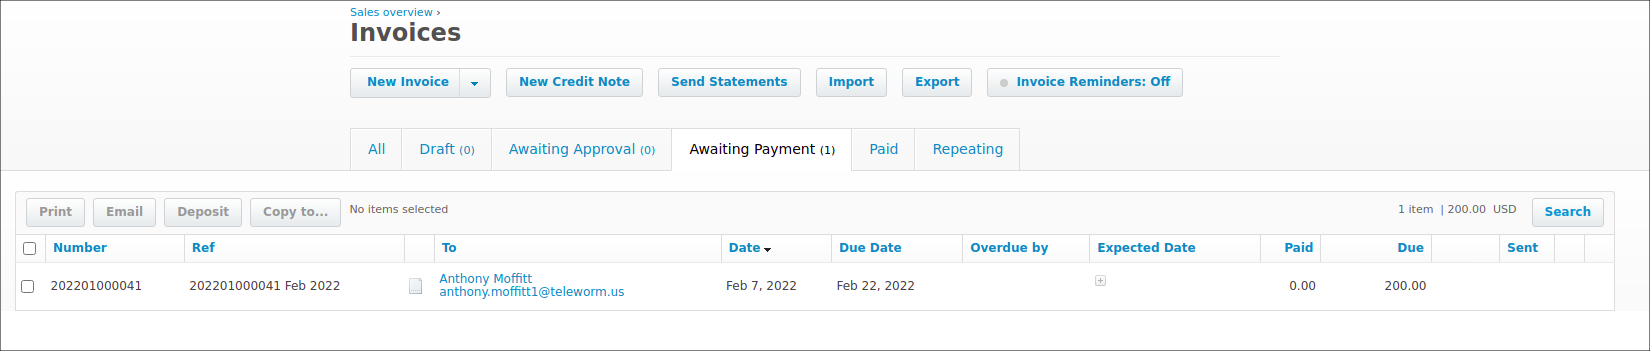
The unpaid invoice of customer was exported to Xero.
2022-02-07 15:29:36.432800 Start new customers synchronization
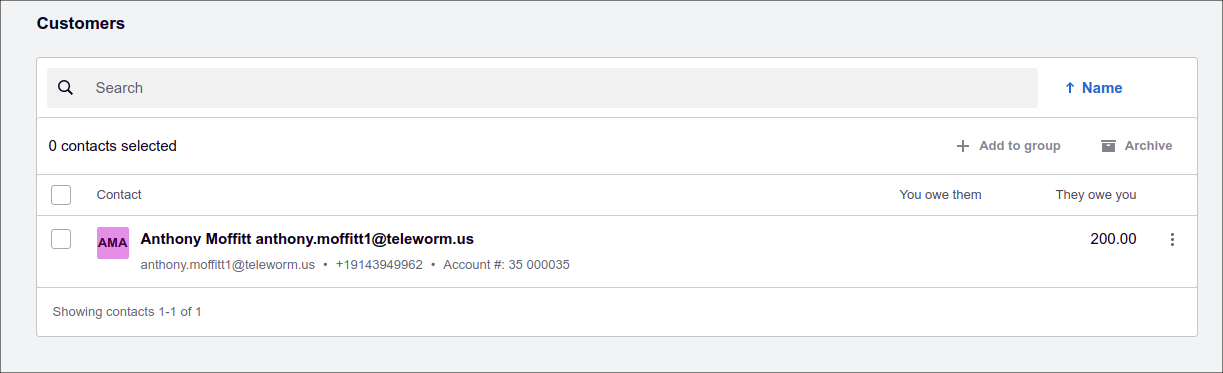
Export customer: Anthony Moffitt.
2022-02-07 15:29:41.686100 New customers synchronization completed
2022-02-07 15:29:41.686300 Start modified customers synchronization
2022-02-07 15:29:41.688400 Modified customers synchronization completed
2022-02-07 15:29:41.688600 Done!
2022-02-07 15:29:56.398800 Start new invoices synchronization
Export invoice: 202201000041.
2022-02-07 15:29:59.667500 New invoices synchronization completed
2022-02-07 15:29:59.667700 Start modified invoices synchronization
2022-02-07 15:29:59.671600 Modified invoices synchronization completed
2022-02-07 15:29:59.671700 Done!
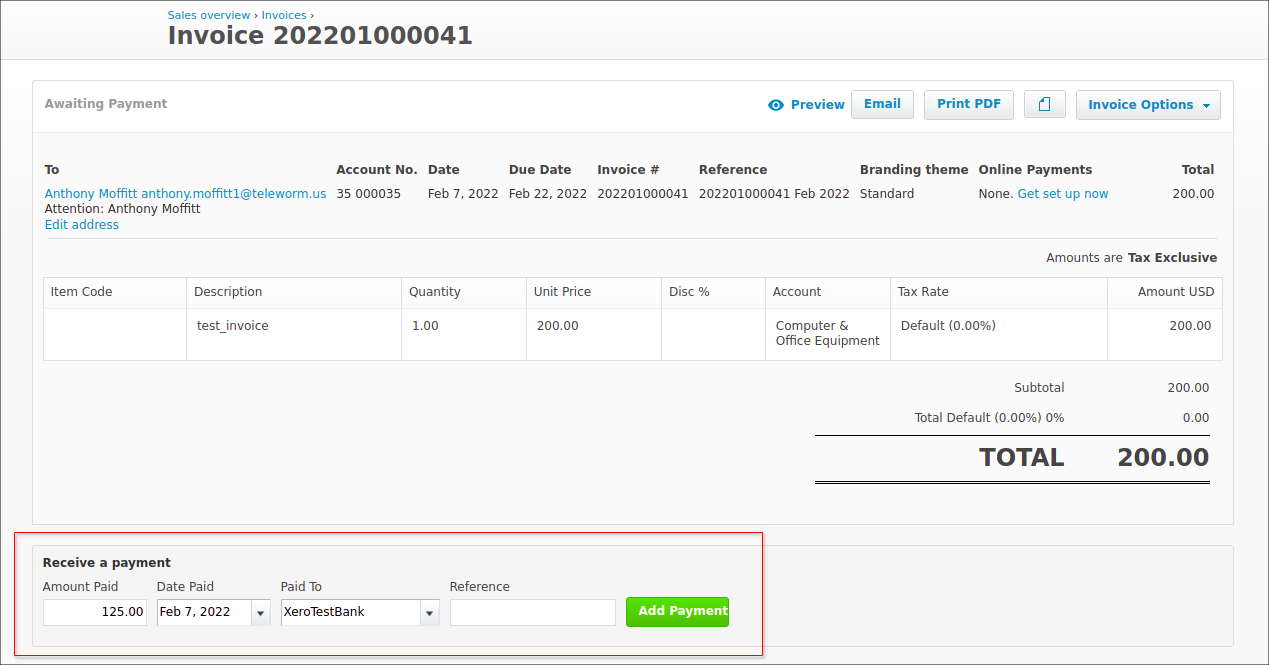
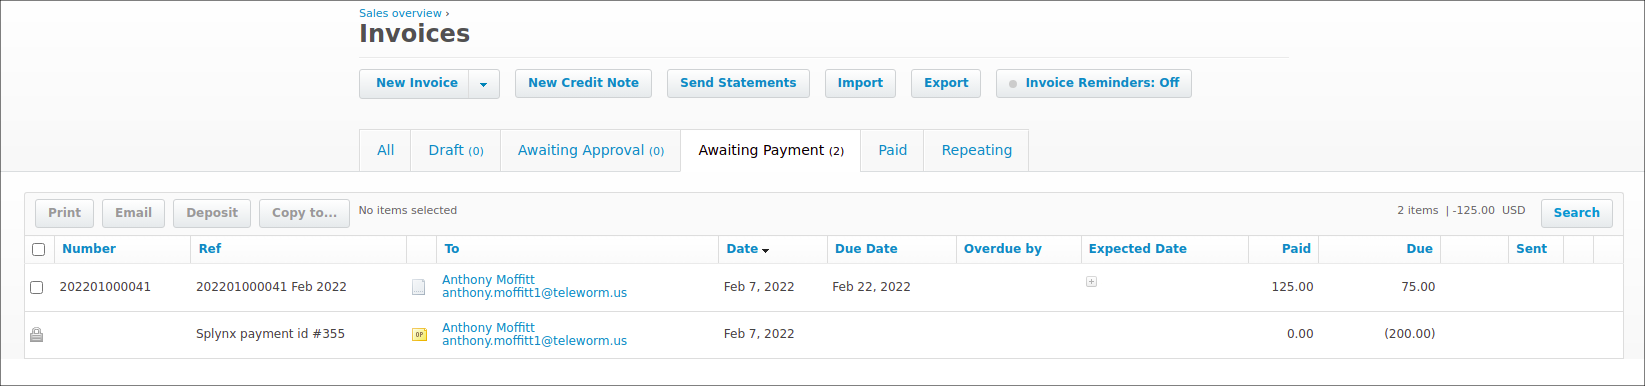
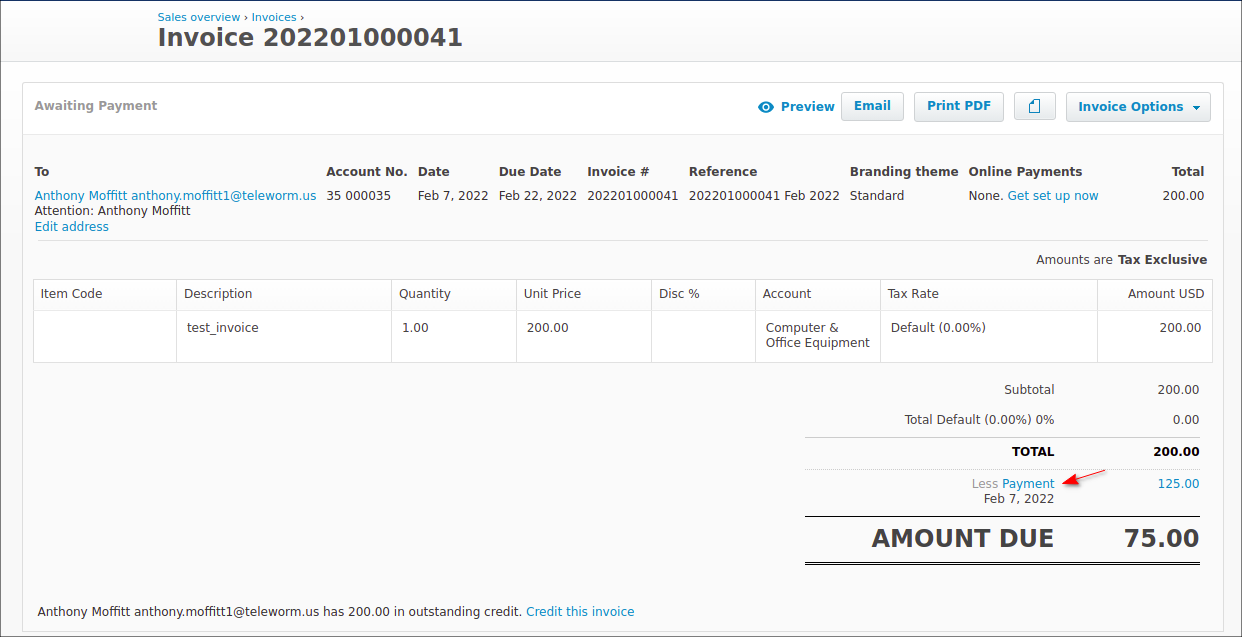
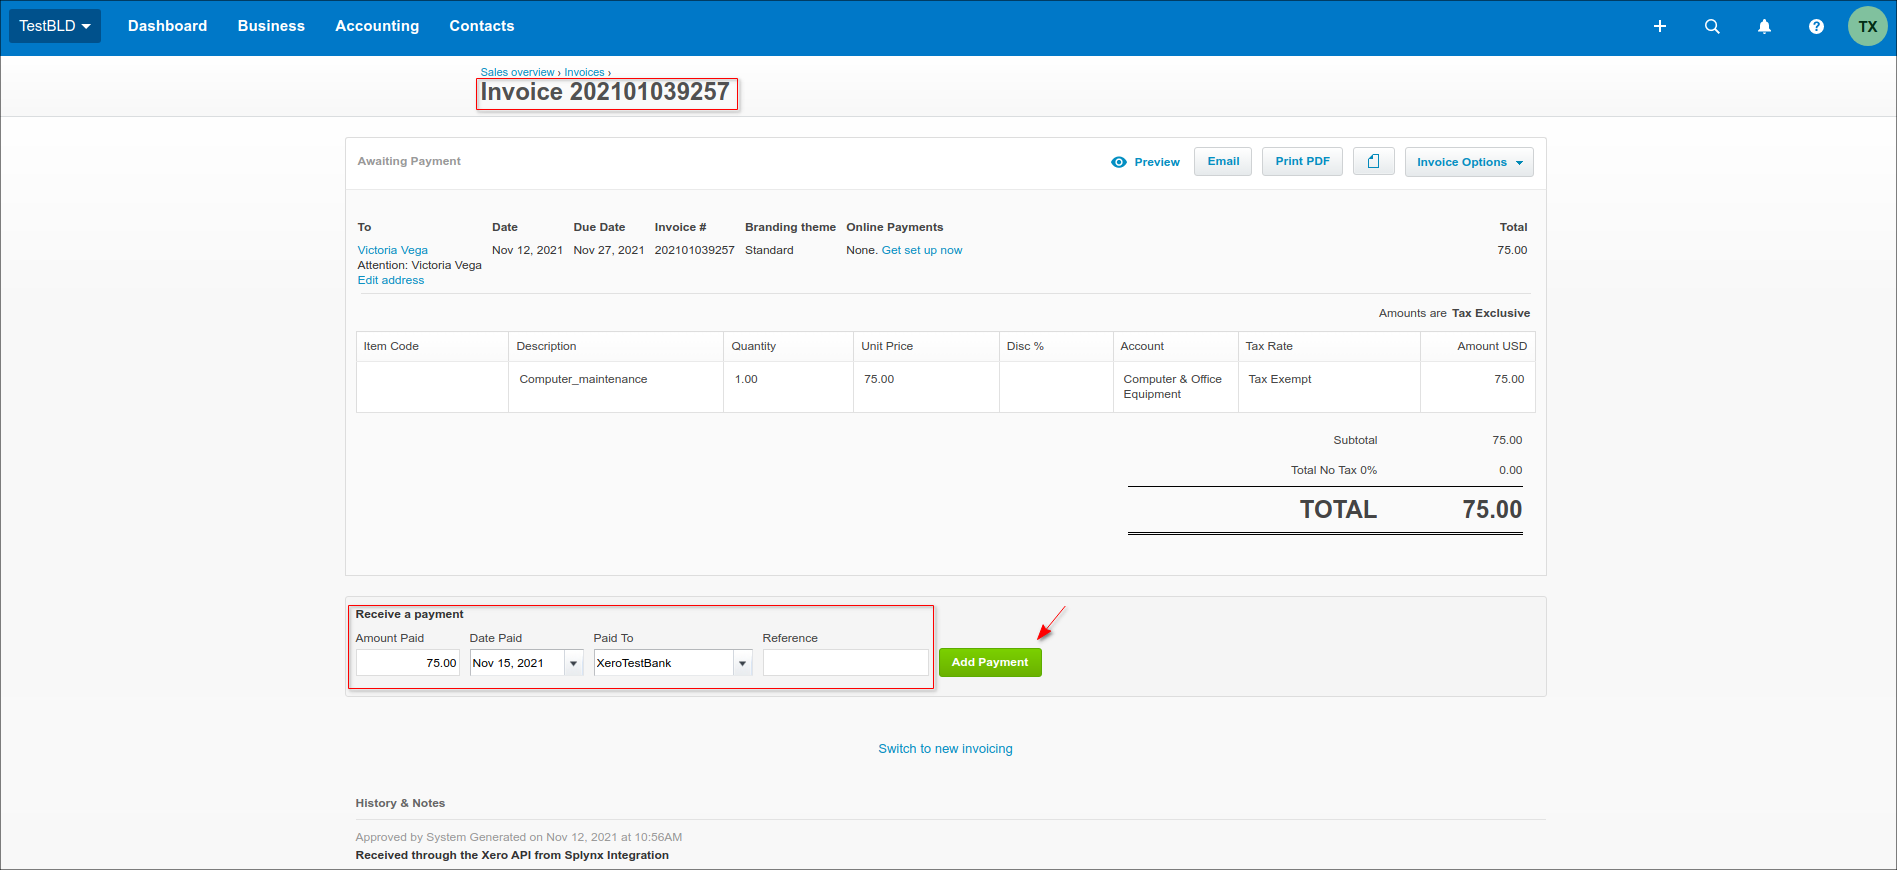
The exported invoice on Xero side is partially paid e.g. from customer balance, as a result the invoice due is 75:
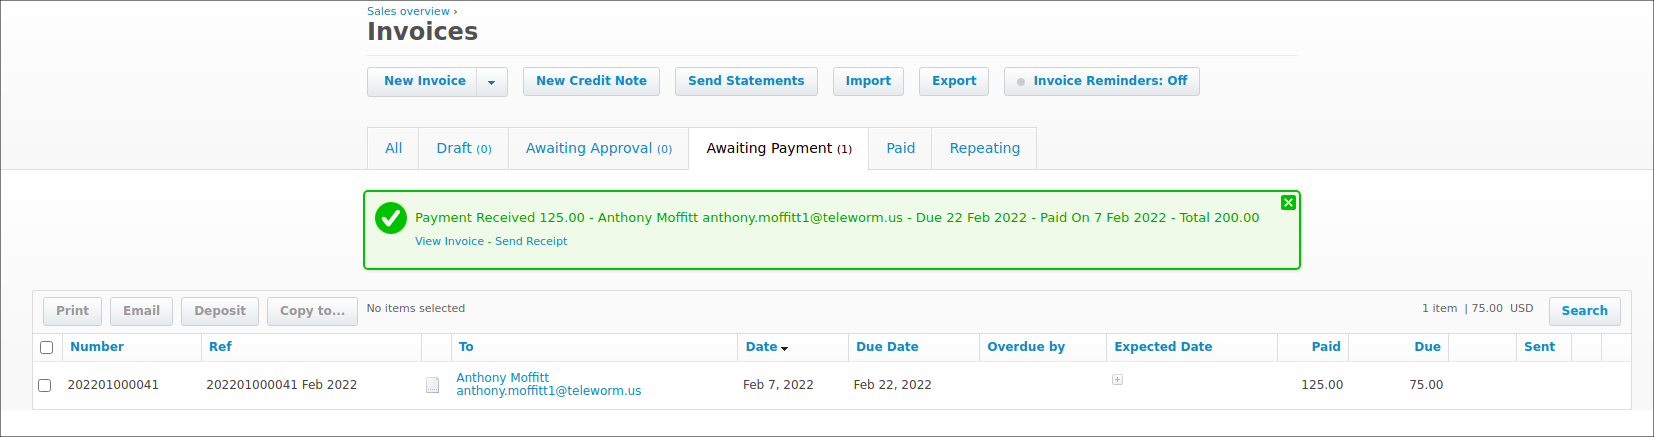
Then, the customer pays the total amount of the invoice in Splynx and this new payment is synced to Xero.
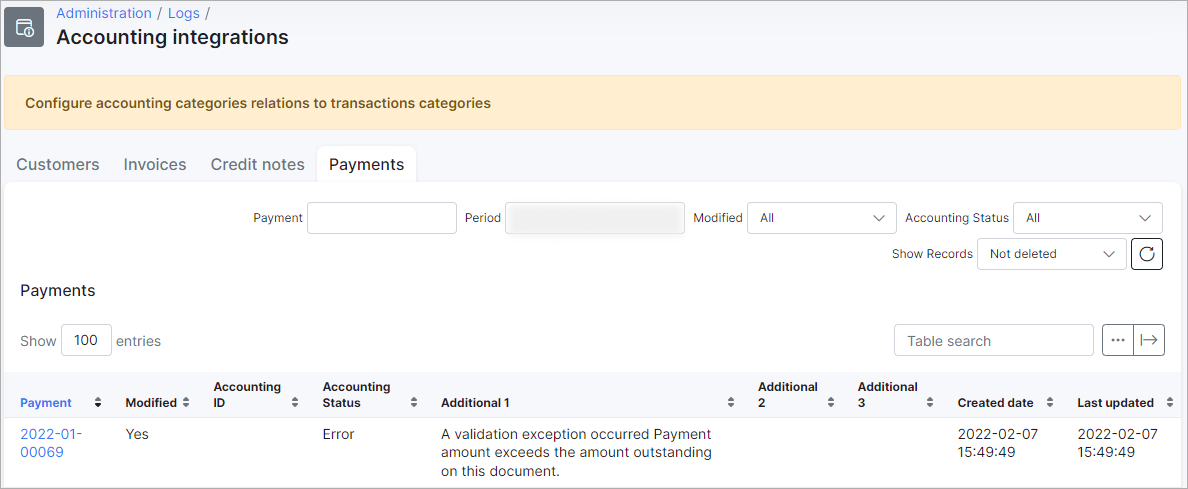
As a result we have the following error when exporting a payment, you can see it directly in the Finance → Xero Accounting section:
2022-02-07 15:50:30.847000 Start payments synchronization from Splynx to Xero
Export payment: 2022-01-00051
api
A validation exception occurred
Payment amount exceeds the amount outstanding on this document
2022-02-07 15:50:35.594300 Payments synchronization from Splynx to Xero completed

2022-02-07 15:50:35.594500 Start deleted payments synchronization from Splynx to Xero
2022-02-07 15:50:35.597100 Deleted payments synchronization from Splynx to Xero completed
2022-02-07 15:50:35.597300 Done!
Also, you can check the log in Administration → Logs → Accounting integrations
To fix this problem, it's necessary to enable Create exceeding invoices/credit notes payments in Xero toggle and press Save, after that, export a new payment from Splynx to Xero one more time.

2022-02-07 16:03:27.057300 Start payments synchronization from Splynx to Xero
Export payment: 2022-01-00051
api
A validation exception occurred
Payment amount exceeds the amount outstanding on this document
Export payment: 2022-01-00051 Exceeds amount of document. Export as Overpayment
2022-02-07 16:03:31.338500 Payments synchronization from Splynx to Xero completed

2022-02-07 16:03:31.338600 Start deleted payments synchronization from Splynx to Xero
2022-02-07 16:03:31.340700 Deleted payments synchronization from Splynx to Xero completed
2022-02-07 16:03:31.340800 Done!
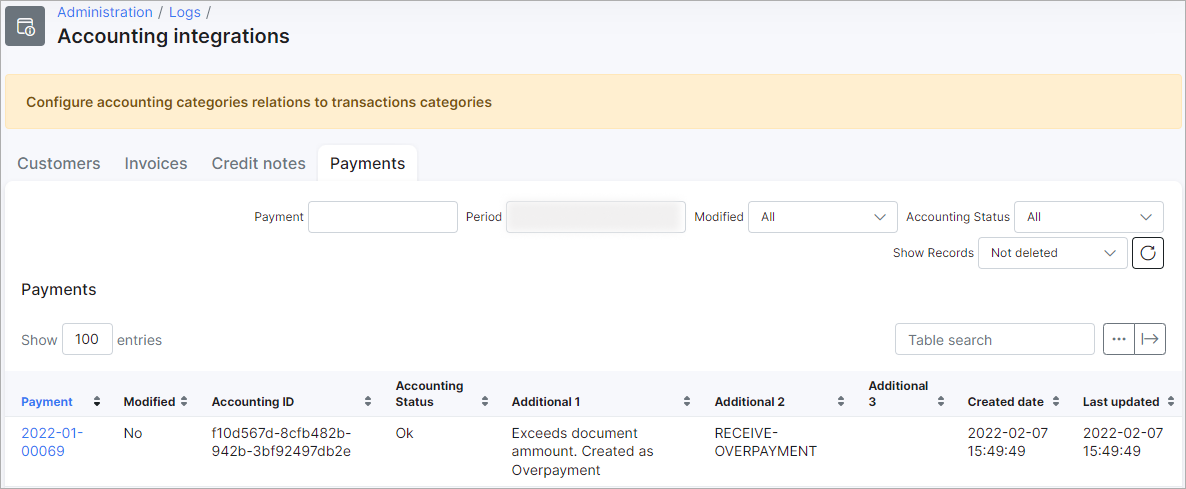
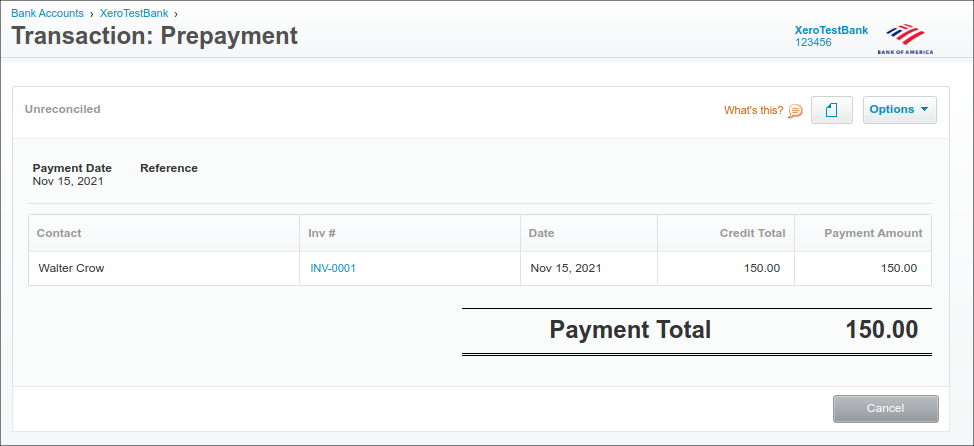
IMPORTANT: This exported payment will not be linked to the customer's invoice, but it will be added as overpayment (or prepayment, it depends on the selected option) to the bank account balance on Xero side:
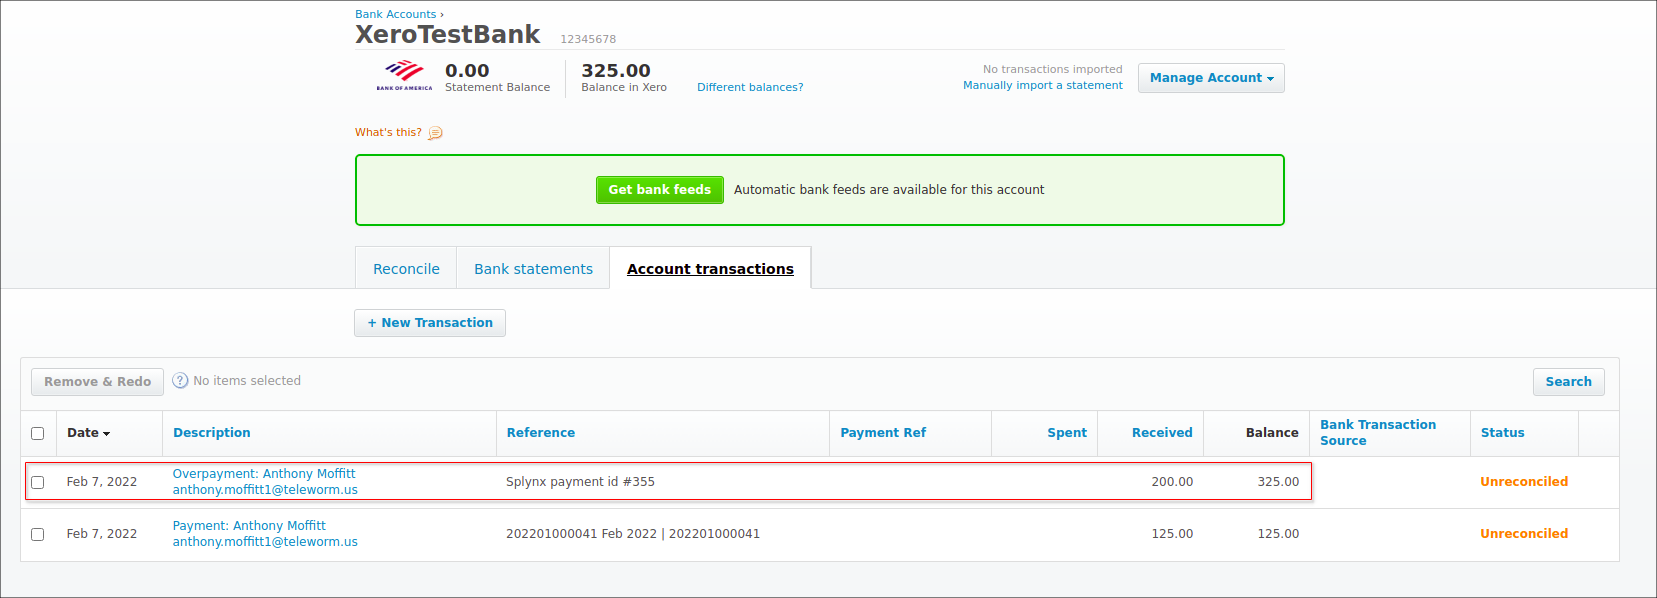
Finally, you can make corrections for payments and if it's necessary, remove overpayment on Xero side

Related Read:
NOTE:
If the option Create payments for prepayments is not used (a toggle is disabled) and you decide to import the (overpayments) payments from Xero to Splynx, such payments will be imported to Splynx as payment statements and should be paired with the necessary customer (-s) manually.

Suggested read: Payment statement processing.
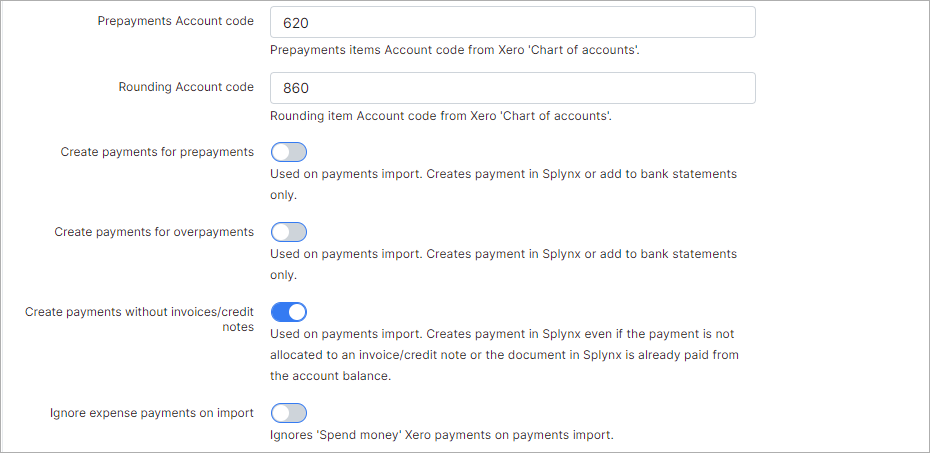
-
Prepayments Account code - a unique code (limited to 10 characters) of prepayments items (the expenditures that have been paid for in advance) in Xero account (
Accounting menu → Advanced → Chart of Accounts); -
Rounding Account code - a unique code (limited to 10 characters) of rounding item (an adjustment entry to allow for rounding) in Xero account (
Accounting menu → Advanced → Chart of Accounts); -
Create payments for prepayments - a toggle allows to enable creating payment for prepayment (a payment made in advance) in Splynx or, in disabled status - add such payment to the payment (bank) statements only. Used on payments import;
-
Create payments for overpayments - a toggle allows to enable creating payment for overpayment in Splynx or, in disabled status - add such payment to the payment (bank) statements only. Used on payments import;
-
Create payments without invoices/credit notes - a toggle allows to enable/disable creating payment in Splynx when customer doesn't have invoice. Used on payments import. Attention: in some cases can lead to duplicate payments;
Example
Let say, we have the following case: Customer has an unpaid invoice for R100. This invoice was exported to Xero and partially paid there in the amount of R20. At the same time, the unpaid invoice in Splynx was paid for the full amount and the payments were exported to Xero. Finally, all payments were imported from Xero to Splynx.
The next settings are used:
NOTE: Splynx v3.1 doesn't support functionality with auto payment, or rather, payments do not pay invoices automatically.
As a result,
-
in Splynx v3.1: the R100 payment that was made in Splynx will be exported to Xero as overpayment and the imported R20 payment will be shown in
Finance → Historyas bank statement, such statement can be manually paired to the necessary customer. -
in Splynx v4.1: the R100 payment that was made in Splynx will be exported to Xero as overpayment and the R20 payment will be imported to Splynx and linked to the necessary customer as a new payment.
- Ignore expense payments on import - a toggle allows to enable/disable ignoring 'Spend money' (a payment that doesn't relate to a bill, expense claim, or refund) in Xero payments during payments import. If option is enabled, 'Spend money' payments will not be added to bank statements;
-
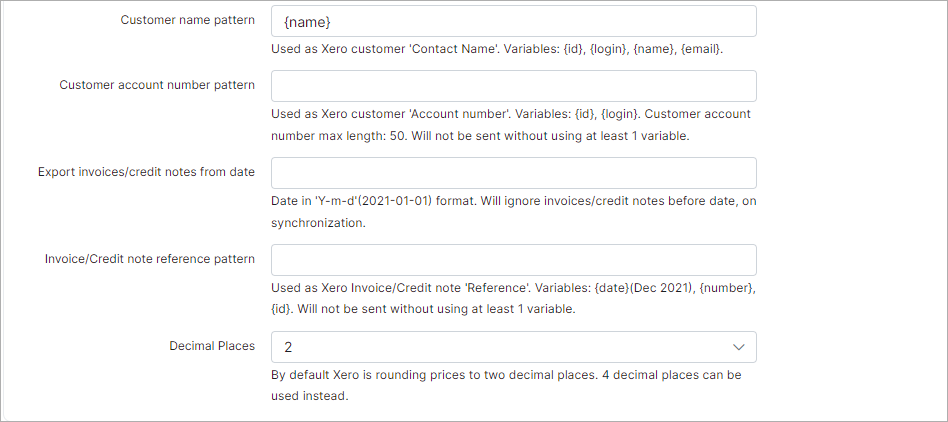
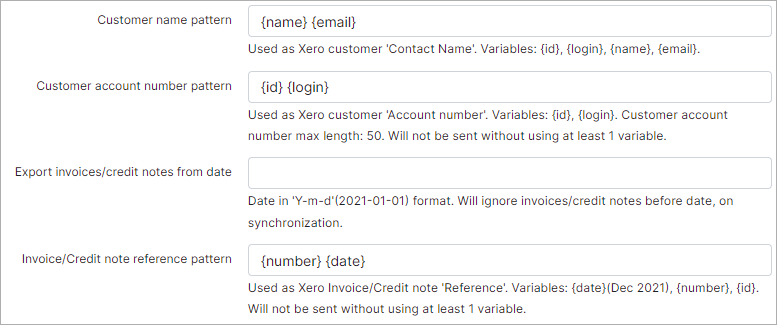
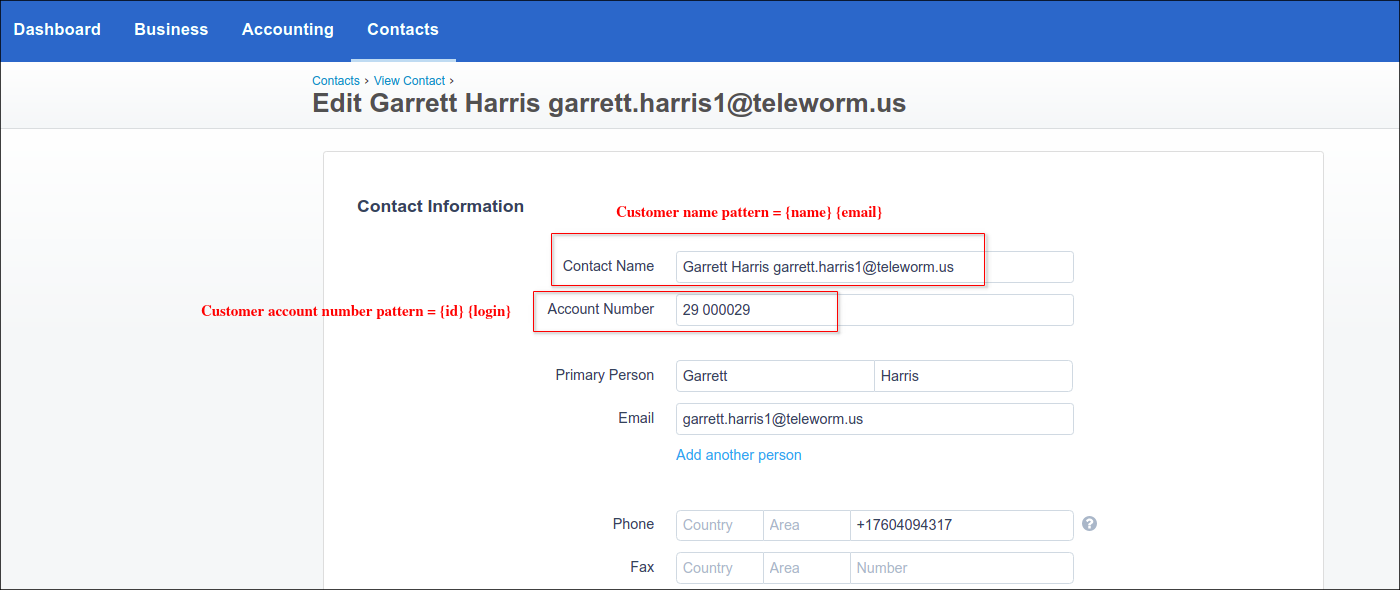
Customer name pattern - used to set the format of the customer name during the sync to Xero. The value will be visible in Contact Name field of customer contact information on Xero side. The following variables can be used in the field:
{id},{login},{name},{email}; -
Customer account number pattern - set the format of customer Account number field during the sync to Xero. The max field length is 50 symbols. The following variables can be used:
{id},{login}; -
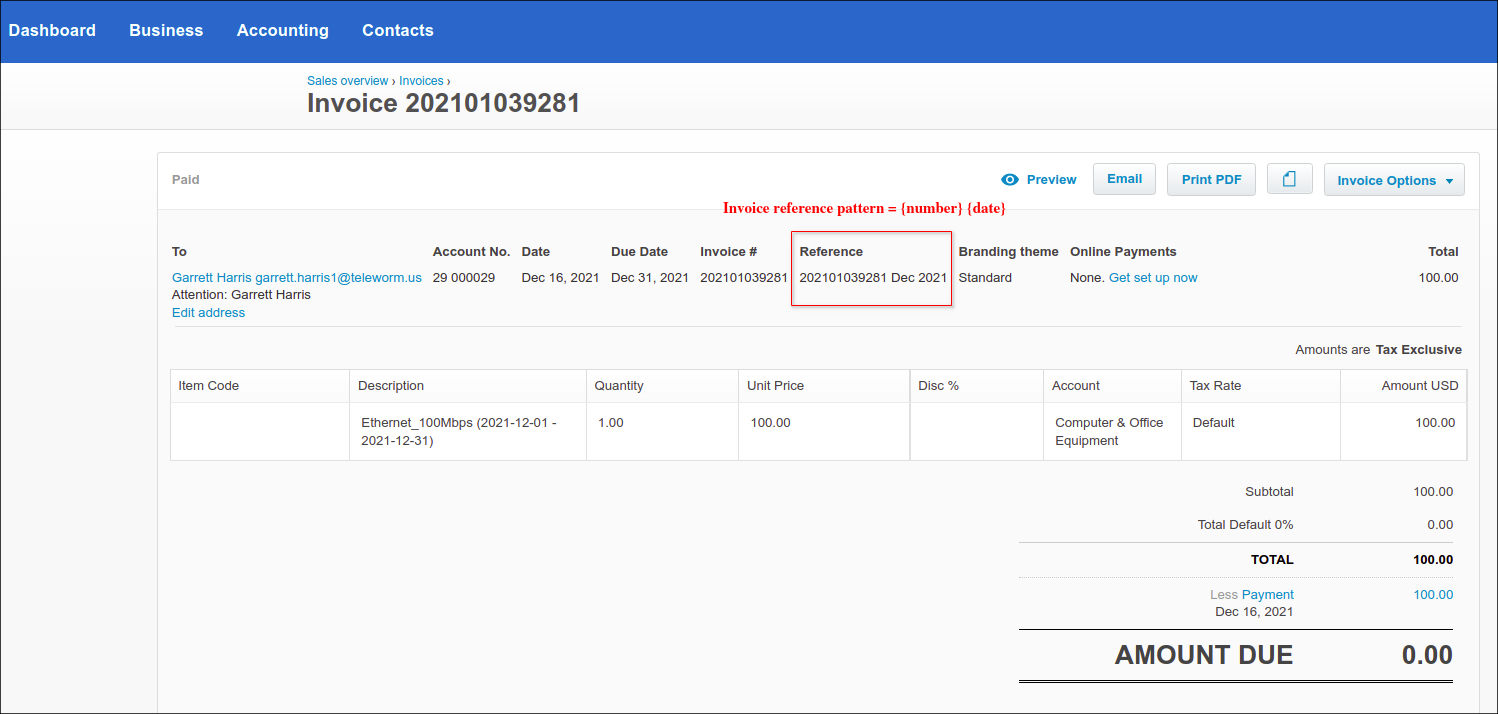
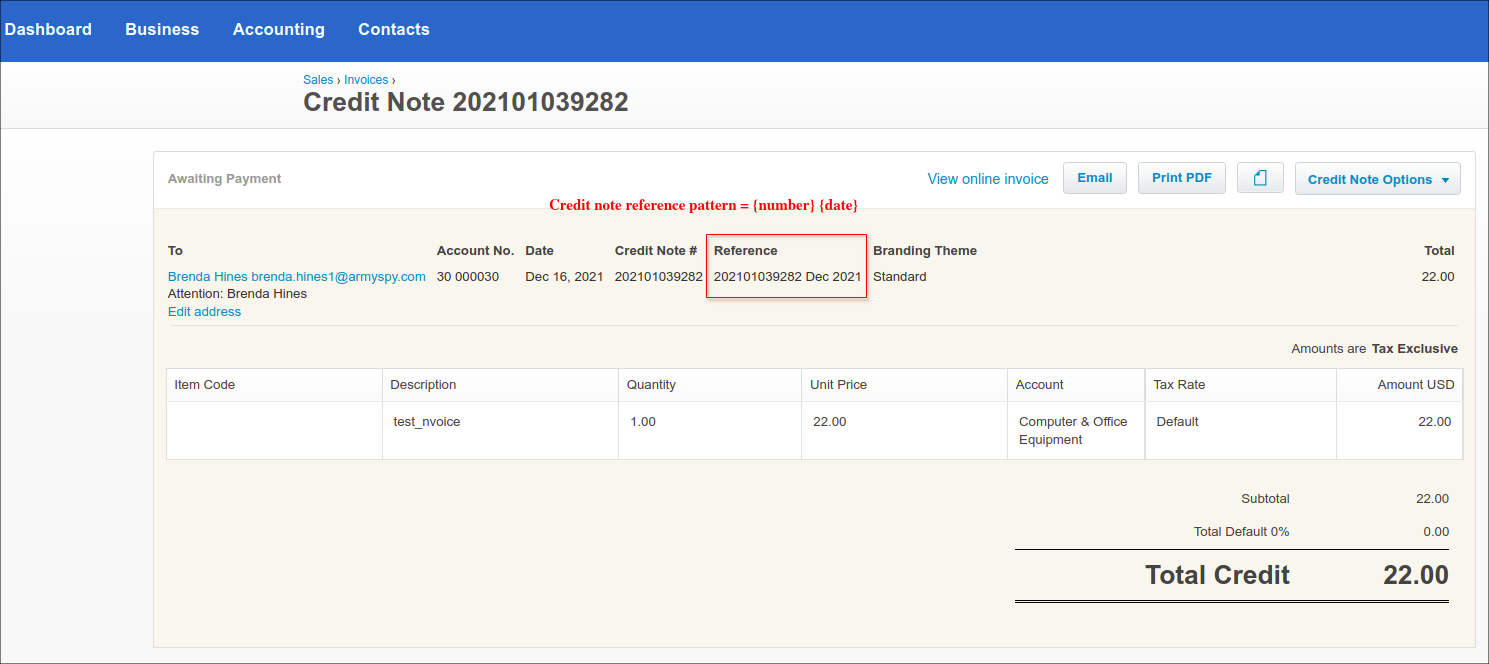
Invoice/Credit note reference pattern - set the format of invoice / credit note (
credit note- the Xero term, it's an invoice with negative total price in Splynx v3.1) Reference field during the sync to Xero. The max field length is 255 symbols. The following variables can be used:{id},{number},{date}(e.g. Dec 2021);
Example of the variables usage
- Decimal Places - by default, Xero is rounding prices to
2decimal places.4decimal places can be used instead.
Cron settings
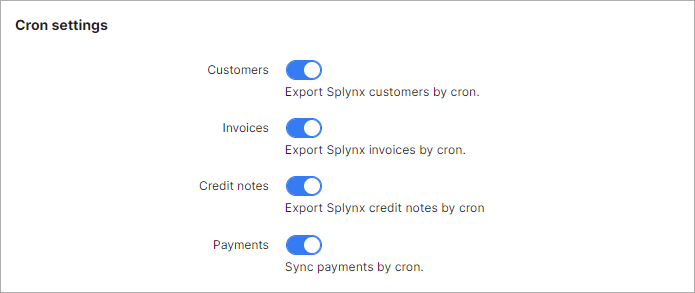
These are the global settings to automatically sync items between the two platforms, in any selected direction of syncing.
Finance → Xero Accounting
- Customers - enables/disables automatic syncing of customers;
- Invoices - enables/disables automatic syncing of invoices;
- Credit notes - enables/disables automatic syncing of credit notes;
- Payments - enables/disables automatic syncing of payments.
Let's start with Xero
Click on Finance item on the sidebar of Splynx and in the drop-down menu click on Xero Accounting.
![]()
In the next step, we have to connect the Xero account with Splynx. To achieve this, click on the Connect to Xero button:

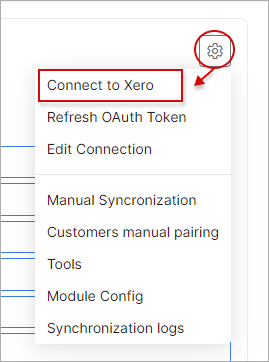
Or click on the small gear ![]()
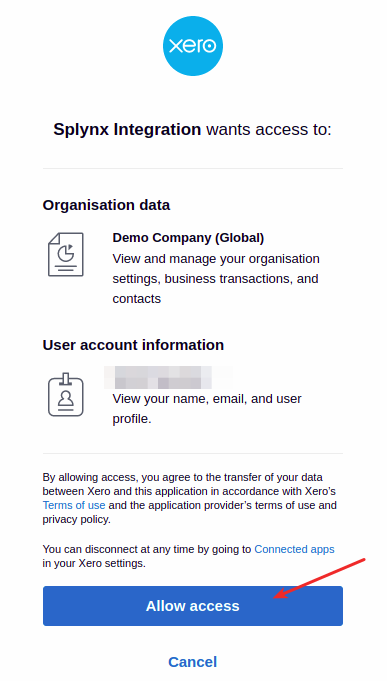
After linking your Xero account with Splynx you will see a list of Xero organizations. Select the organization which you will use with Splynx:

When the Xero account linking process is completed, the next step is to import mapping settings (chart accounts, tax rates, and bank accounts from Xero) into Splynx. Click on the Import mapping settings into Splynx button to achieve this.

When this process is completed, navigate to Config → Finance and find the following sections: Accounting categories, Accounting bank accounts and Accounting taxes - each of which will have to be configured.

Let's start with Accounting categories:

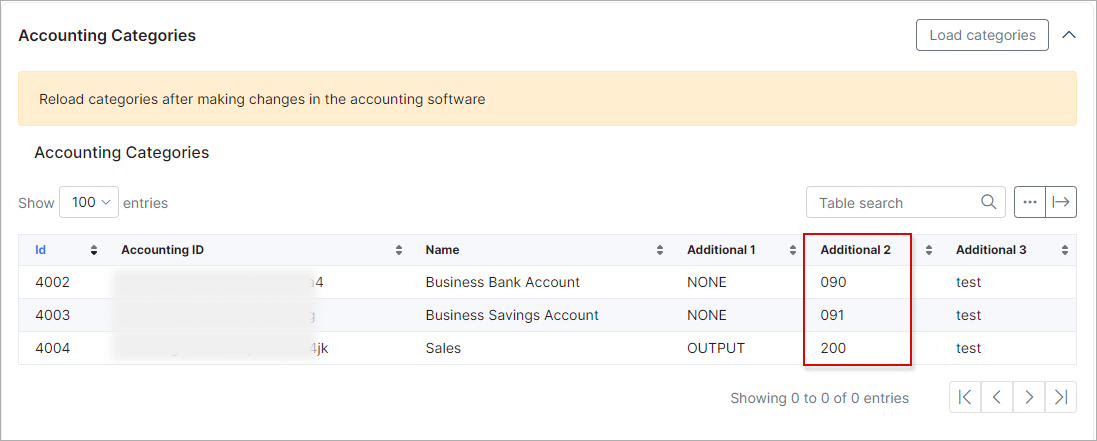
In Categories map section, ALL categories must be selected with the related item from Accounting categories table. Pay attention to the Additional 2 field in Accounting categories table, each category should have an account code. To enable displaying of additional fields, click on the breadcrumbs (column selector) button at the top right of the table and simply enable the necessary fields to display:

As soon as the relevant categories are configured, we can proceed with bank accounts:

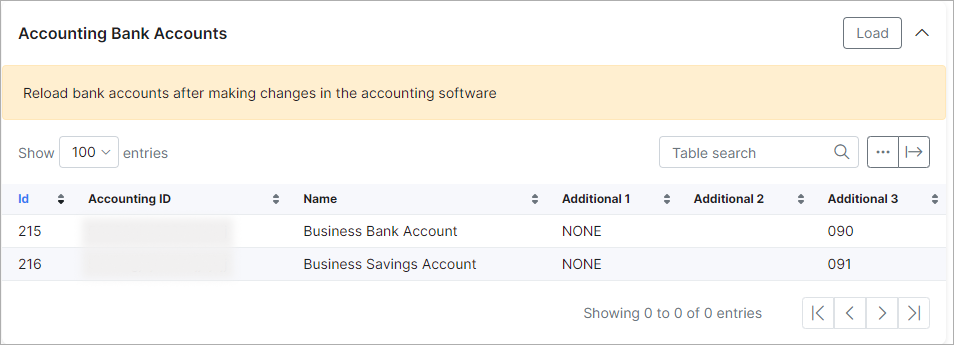
We will follow the same procedure with bank accounts, each bank account should have an account code (Additional 3 field here) and the default bank account should be selected.
The last step in the accounting config is tax rates configuration. The tax values in Splynx must match the same values in Xero:


Once Accounting categories, Accounting bank accounts and Accounting tax rates are configured, the Splynx Xero add-on is ready to start syncing.
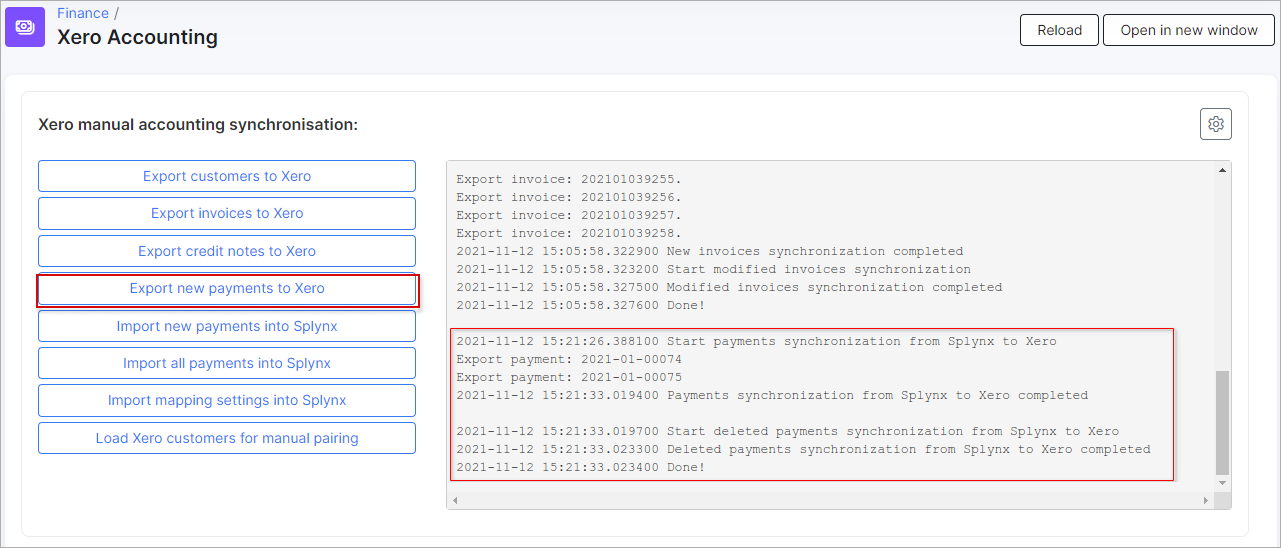
In our test environment, we have 2 customers and a few invoices for each customer, let's export them to Xero:

Once the customer export has completed, we can start export their invoices to Xero:
-
The invoices without transactions or marked as Deleted in Splynx will not be synced to Xero;
-
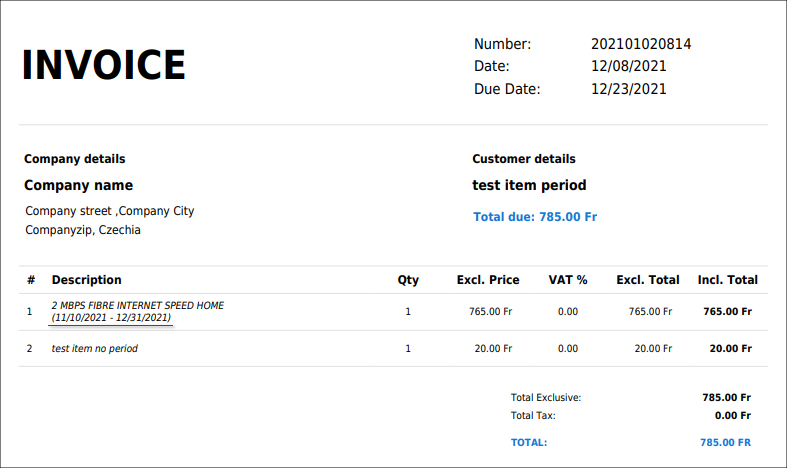
If the invoice includes item with a given period of time in Splynx, such period will be added to the related item description on Xero side after sync.
Example


On the Xero side, we can see our synced customers and invoices:

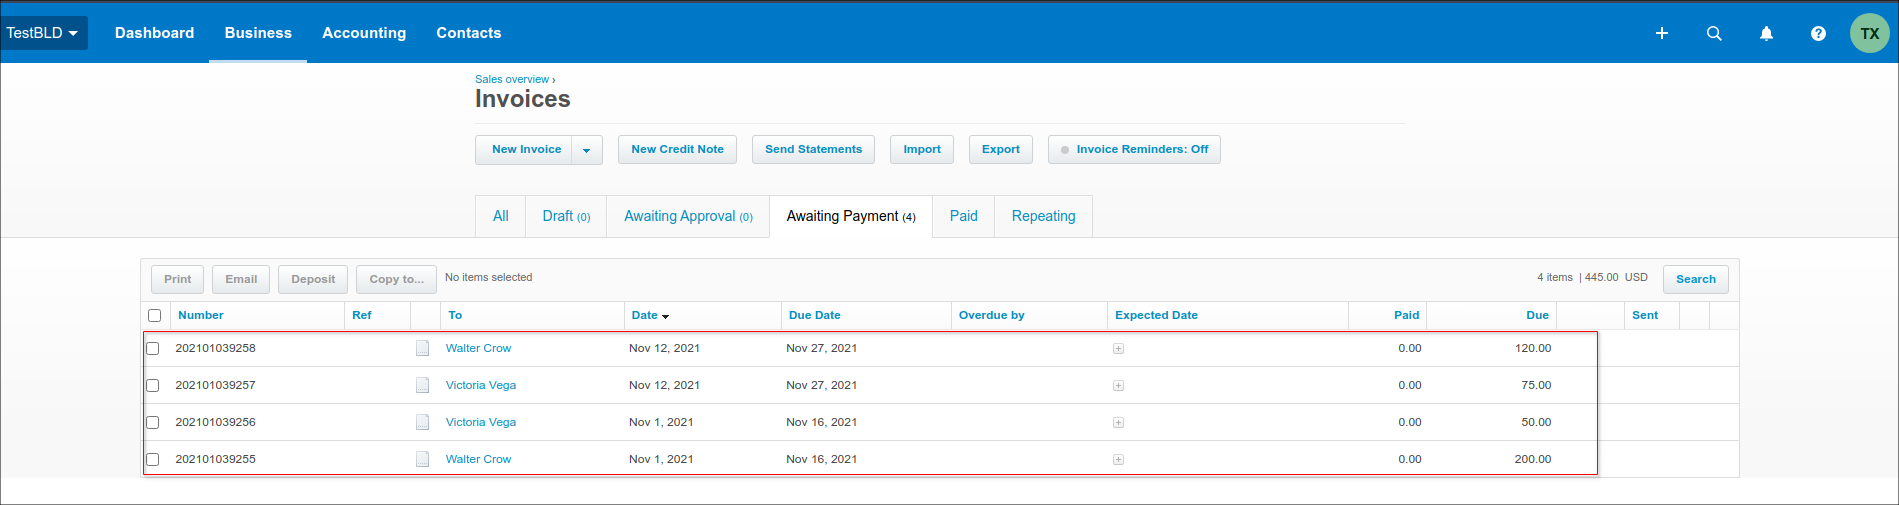
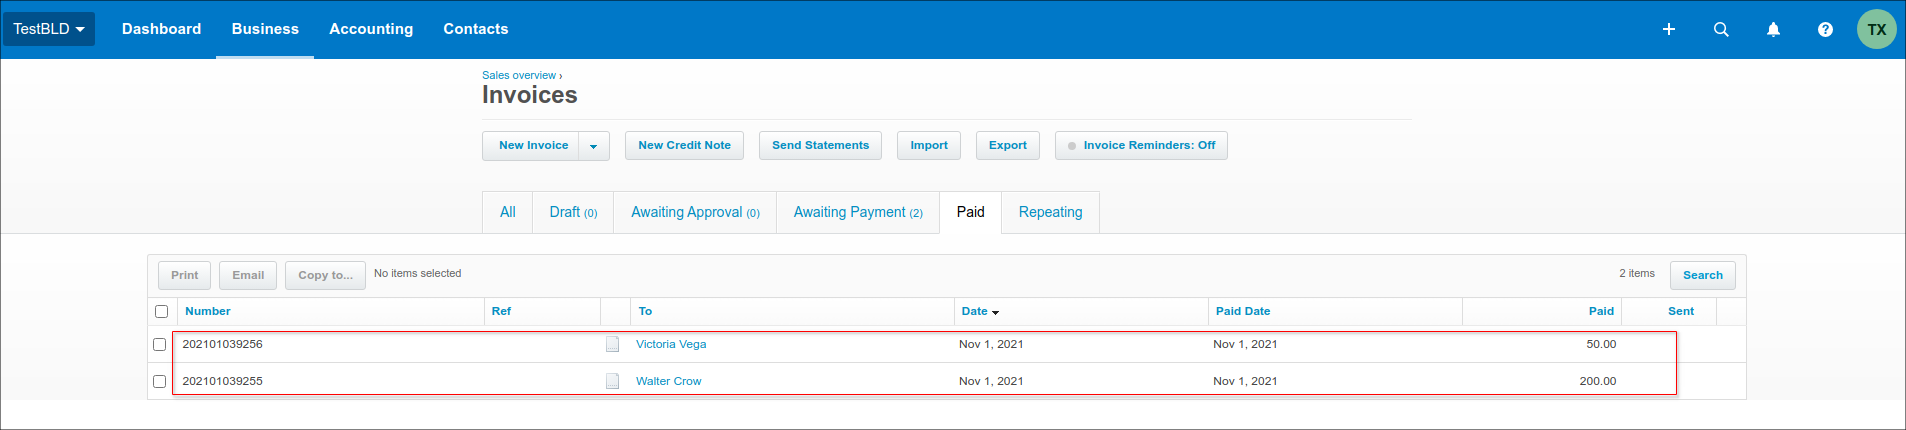
For example, customers have paid 2 invoices in Splynx. Now we can export payments from Splynx → Xero:
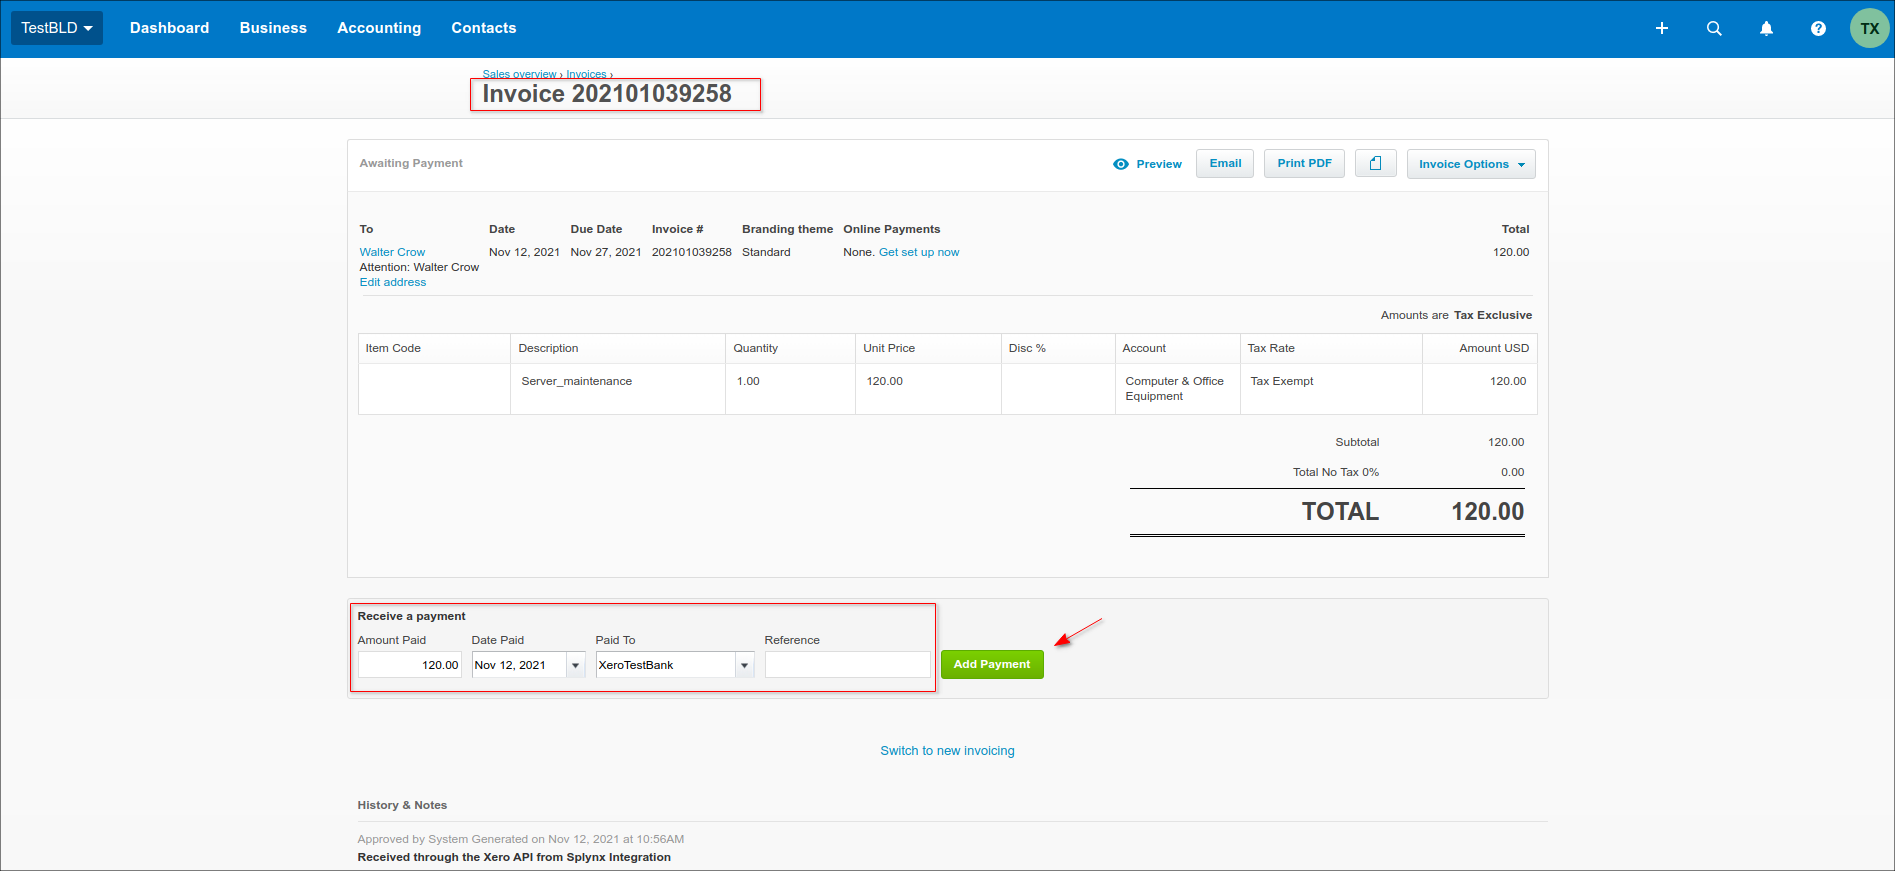
Let's add 2 payments to the unpaid invoice on Xero side:


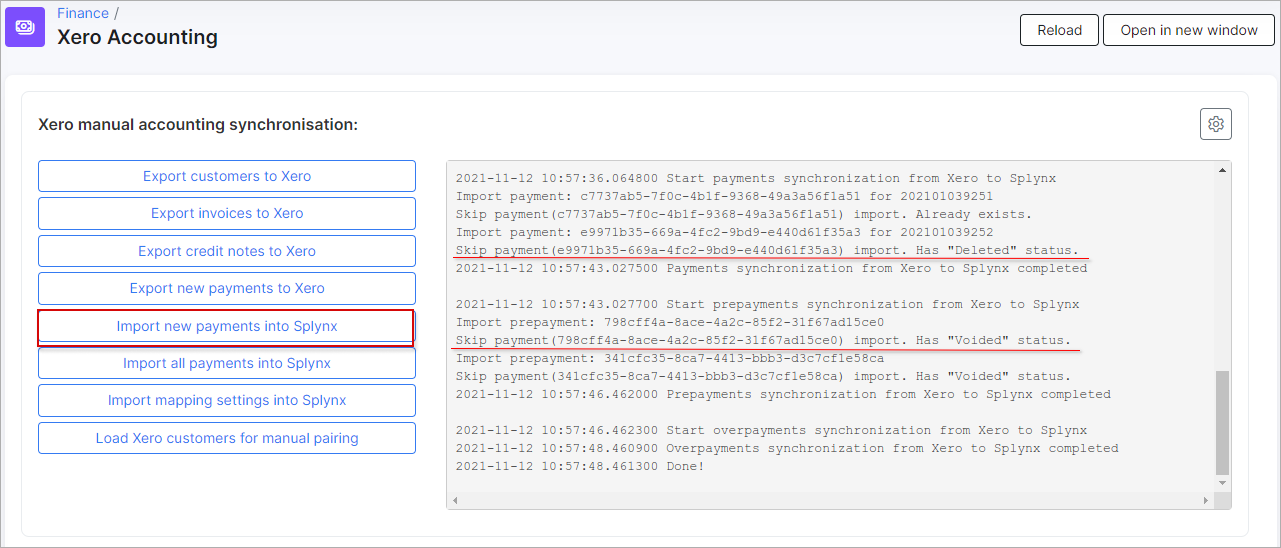
Now we can sync payments from Xero → Splynx by clicking on Import new payments into Splynx. Only payment which is matched to a corresponding customer will be created in Splynx.

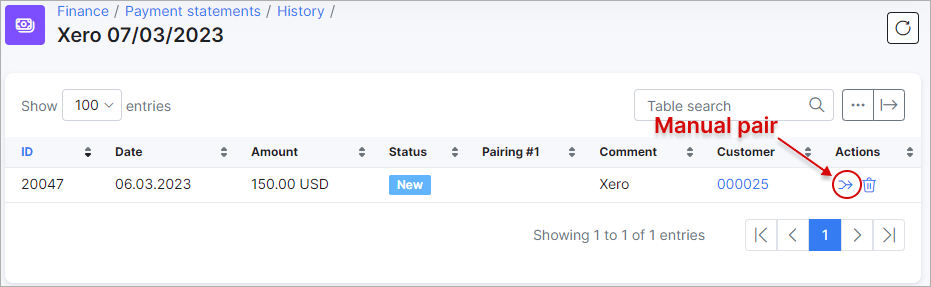
Payments which we've synced from Xero can be viewed in Finance → Payment statements → History:

Here you can check the status of synchronization in relation to each payment item. More information can be found in Payment statement processing tutorial.

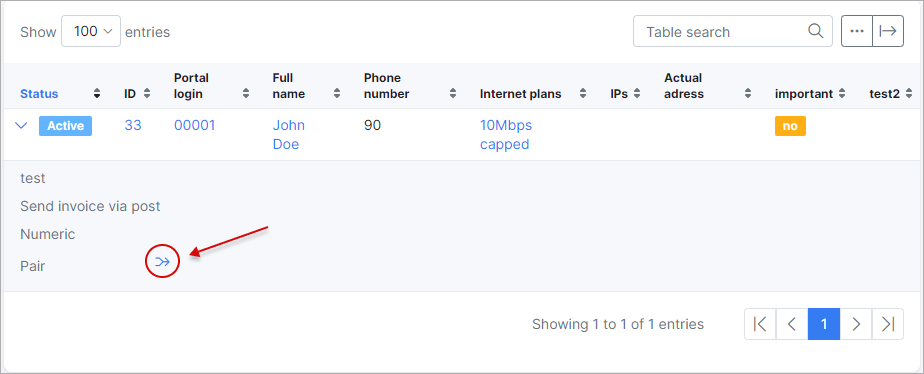
Sometimes it's required to manually pair a statement record (create a payment in Splynx) to a customer, for example a prepayment (overpayment) was received on the Xero side.
To do the manual pair, open Finance → Payment statements → History, choose Xero statements then click on the ![]()
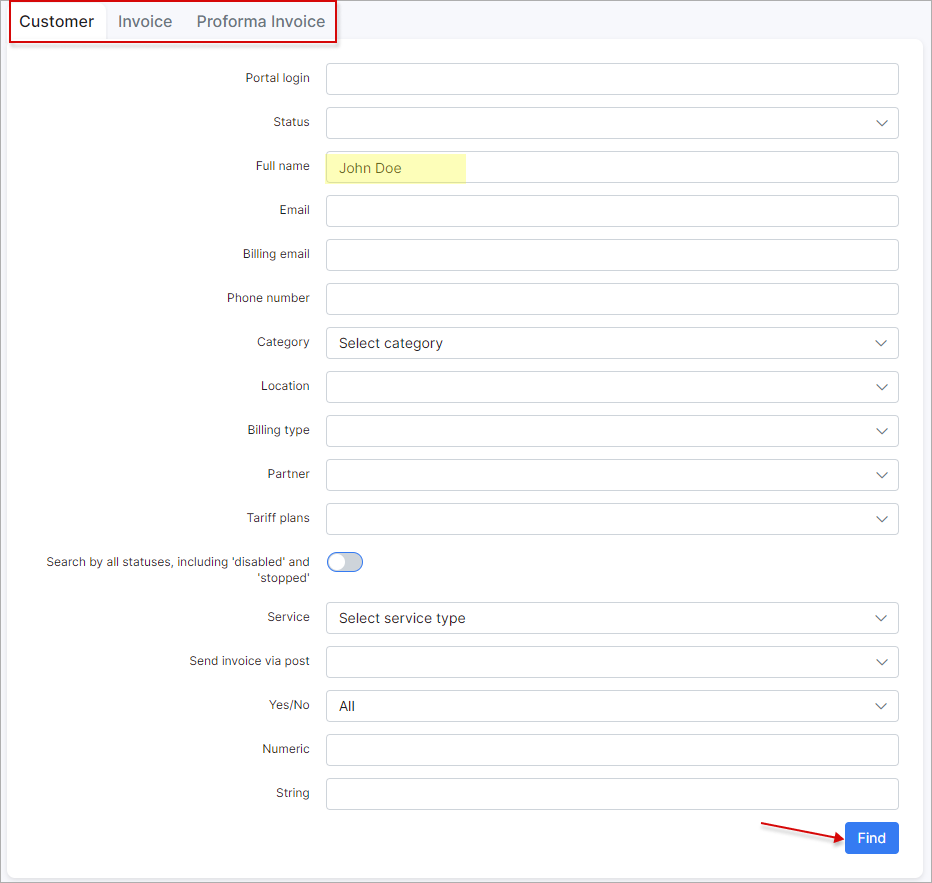
Then find the necessary customer, invoice or proforma invoice to pair with:
We recommend to check payment (bank) statements on a regular basis.
Xero logs
Sync logs can be found under Administration → Logs → Accounting integrations:

If a customer/invoice/credit note/payment has an Accounting ID, this indicates that it was synced, if not - it was not synced.

The same for invoices/credit notes and payments: if Accounting ID is present - it was synced:
Invoice ID corresponds with Splynx invoice ID's.

Payment ID corresponds with payment ID's in Splynx.
Xero tweaks

In this menu, there are a few more settings and tools related to the Xero add-on:
-
Connect to Xero - if the Splynx-Xero addon was disconnected from the Xero account, you have to reconnect here;
-
Refresh OAuth Token - setting to refresh the OAuth token;
-
Edit connection - used for editing the connection with Xero, when the credentials were changed in Xero;
-
Manual Synchronization - used to open
Finance → Xero Accountingwhen you are located in other menu window; -
Customers manual pairing - this function is used where there are existing customers in Splynx as well as Xero. There is a
Load Xero customers for manual pairingbutton. This feature pulls the customer list from Xero into Splynx and allows the admin to manually pair the customers without having to create them in either platform again;


We have 3 customers and they are paired, if the status is Not paired in the "status" field, you can find the required customer from Xero to pair with this customer.
- Tools - this menu is used for resetting the accounting database, all items that were selected previously in
Accounting categories,Accounting bank accountsandAccounting tax rateswill be erased. It is mainly used when the organization changes. Before changing the organization, the accounting database must be reset:

- Module Config - the link is used to open the Xero add-on configuration page (
Config → Integrations → Modules list → Xero Accounting).